Photo Repair
Photo repair or restoration is an art and therefore is approached quite differently (with vastly different results) depending on the skill level of the person performing the work. It’s important to see a lot of examples to make sure the artist meets your expectations. If you Google “Photo Restoration” or “Photo Repair” you can have your pick of thousands of sites. Have a look at the wide range of quality available.
This example was quite difficult to restore and in order to save the customer some money we repaired only the important details and faded the edges to a soft oval.
These are the steps used to repair this photo:
- Channel Mixer swapping the Green and Blue channels into the Red because the Red channel had the best contrast in this case.
- Duplicate layer, then Curves to increase contrast (Levels would have worked as well, I just prefer Curves) brushing the change through a mask, then flatten
- Highlight/Shadow on another duplicate layer to increase mostly highlight detail, brushing through a mask and flattening again.
- Redrawing missing detail using the Brush tool
- Fade soft edges
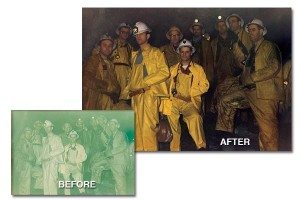
There are a lot of similarities between this photo and the dark wedding photo above. This faded mining photo was restored by:
- Channel Mixer (Red Channel was the best again) to convert it to a black and white.
- Curves on a duplicate layer to enhance the contrast, brushing in the change.
- Curves again but this time on about 8 duplicate layers, each one with a curve applied for the various colours in the photo -flesh, yellow, red etc. brushing softly through masks to mix the colours.
- The image is flattened and final tweaks made to the colour
Broken photos like this one can be repaired by:
- Selecting each piece. There are a lot of ways to do this but the easiest for this one is the Quick Selection Tool.
- Each selected piece needs to be on it’s own layer. The best way for this is to create a new document, slightly bigger than the final size of the image. Then drag (or copy and paste) each selected piece to it’s own layer.
- Using “Edit/Free Transform” rotate each piece to fit together.
- Flatten the image.
- Use a combination of Curves and Shadow/Highlight to increase the contrast.
- Fix the joins using mostly the healing brush.
- Draw the missing pieces using whatever drawing tool you’re most comfortable with. I prefer a soft brush and starting with Photoshop® CS 5, the new mixer brush tool does a great job at blending.


